About resolution
of
film scanners
by Lorenzo Comolli
First written in
1998,
last update in 2006.
Thanks to the
anonymous
readers who reviewed my original English text, and corrected its
grammatical
errors. Any residual error is due only to the author and it's updates.
With advances in computer technology it
is possible to digitally enhance our astronomical images. The process
of
digitization of the images becomes a problem to be seriously
considered.
If we want to get the maximum information from our images, it is much
better
to scan the original negative or slide than to scan a print, which
already
has lost some original detail. Commercial film scanners have
resolutions of 2700 dpi (in the
price range
of under $1000) and 4000 dpi (<$2000) and from
24x36mm film (35mm format) thay produce
files of about 50 and 130 MB (at 16bit/channel, RGB).
Those scanners are considered to produce high resolution scans and with
good reason. But when we look
at high resolution astrophotography with hypersensitized Kodak
Technical
Pan (unfortunately discontinued in 2005), a resolution of 2700 dpi
is found to be inadequate.
Only
the problems associated with scanning Tech Pan will be examined in this
article.
The
film
Tecnical Pan is a very high resolution film.
Measurements show the grain size to be 3 micrometers. The smallest star
sizes
that can be achieved with this film are about 9-10 micrometers. The
pixel size
of a 2700 dpi film scanner is also 9-10 micrometers. This is not
sufficient
for resolving the smallest stars as one pixel would equal one star and
the result would be a square star. It's assumed we need to oversample
the
star by a factor of two or three to achieve adequate resolution. This
implies
an optical resolution of 5000 to 8500 dpi. (These numbers are not exact
multiples of 2700dpi but are the resolutions I have chosen to use for
the
graphical simulations on this page.) Ideally we would like to resolve
the
grain of the film but that would require 25,000 dpi and would generate
a 5 GB file from 35mm film! This is beyond the capability of most
computers
in use today.
The
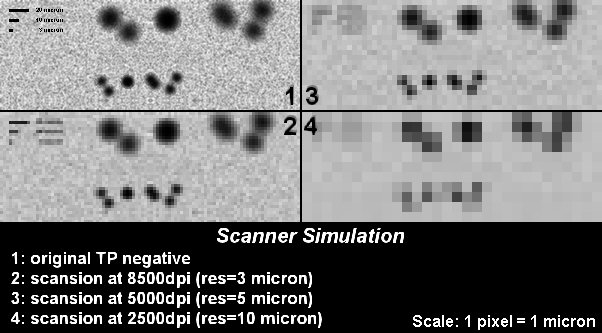
simulation (1)

The image above shows what we lose when
using a scanner. (Click the image for a higher resolution version.) A Tecnical Pan negative is shown at full resolution in box
(1); note that it's not a real
image but a digital simulation. The stars in the upper row of each box
are 20 micrometers and the stars in the lower row are 10 micrometers.
Scanner resolutions
of 8500, 5000 and 2500 dpi are shown in boxes (2), (3) and (4)
respectively.
It is easy to see that a scanner resolution of 2500 dpi is completely
inadequate
to resolve the stars. A scan at 5000 dpi is a good compromise between
resolution
and file size. At 8500 dpi the grain of the film begins to resolve.
Even
a scan resolution of 8500 dpi cannot be compared to a traditional
print,
but there are many advantages to be had by digitizing the image and
enhancing
it with software like Photoshop.
The
simulation (2)

Click on the
image
for the hi-res version, because this little reproduction does not give
a correct idea.
|
This simulation is surely more
realistic
than the preceding because it's based on a VERY HIGH enlargement print
from a Technical Pan negative realized from one of the best Italian
astrophotographers:
Aldo Radrizzani (unfortunately passed away in July 2005). The telescope
is a Schmidt camera with 30cm free aperture
at f/2: this instrument gives very little stars, at the limit of film
capabilities.
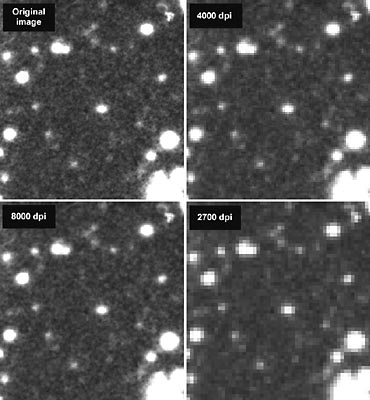
My idea was to realize a very high
enlargement
print, to digitalize it and to degrade it to the resolution of various
scanners (2700 and 4000 dpi) and to an ideal resolution (8000 dpi). In
this way it's evident what we lose in digitalizing a negative. Note
that
the results are in agreement with the simulation (1): 2700 dpi are not
enough for Tecnical Pan, 4000dpi are a little better, but 8000 are
much better. |
Now a consideration of dimensions:
Aldo's
negative is a dish of 77x77mm diameter. How large will the files be for
a 77x77mm
image at the various resolution?
77x77mm
film
|
Scan dimensions [MB]
|
Resolution
|
B/W, 16bit/channel
|
RGB, 16bit/channel
|
2400
dpi
|
106
|
318
|
|
2700 dpi
|
134
|
402
|
|
4000 dpi
|
294
|
882
|
4800
dpi
|
423
|
1270
|
|
8000 dpi
|
1176
|
3529
|
9600
dpi
|
1694
|
5082
|
With such dimensions it's obvious that
it's hard to work on the images. With actual PCs (January 2006) we can
work on images of max 300-400MB, and also on those we risk to use swap
files and virtual memory that slow down the work considerably. We
have to wait many years, maybe 5, before PCs with the needed power to
work on 8000dpi images will be
available at reasonable prices.
The scansions
After the first draft of this article, now
are avaiable good film scanner at prices under 500$. For Aldo's films I
needed a large format scanner (to scan 100x120mm film). Up to now there
are no dedicated film scanner, at reasonable prices. So I've selected a
flatbad scanner with film support, with a good resolution (4800dpi) and
high quality (16 bit/channel and low noise). My choice is the Canon
CanoScan 9950F that can scan film up to 200x300mm!
So I've started to scan and elaborate the Aldo's films, the BW ones at
4800dpi (file of more than 400MB) and the color ones at 2400dpi
(more than 300MB). The elaborations needed a lot of time on my PC with
a AMD Athlon64 3200+ with 1GB of RAM (that
will be 3GB in short...). On the average I need an hour to scan and
elaborate at best a BW negative. The work is hard but the results are
impressive, it's incredible to examinate and navigate in images of
15000x15000 pixels.
The upper simulation revealed to be confirmed: at 4800dpi the stars are
well resolved and also some grain is visible. And so this is the
better compromize for scanning the while archive of Aldo. The
results are very good, so that they can be passed to next generations
on digital support, preserving the work from the unavoidable degrade of
the negatives.

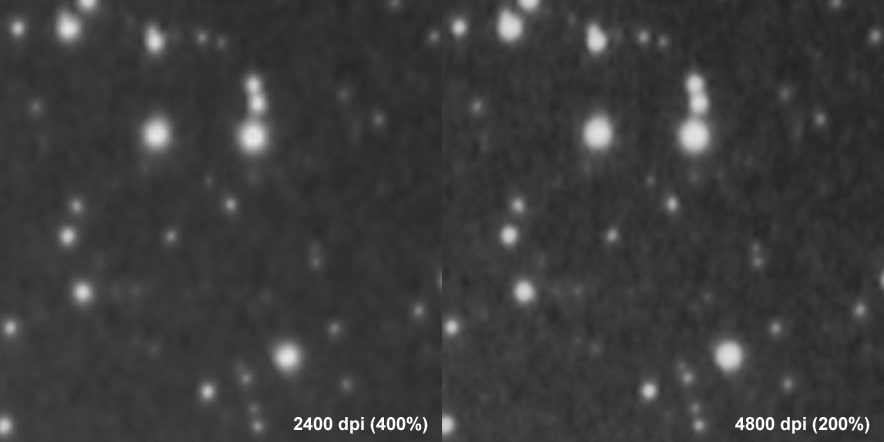
Scansions with CanoScan 9950F:
comparison between 2400dpi and 4800dpi. Zoom at 400% and 200%
respectively. This is a field north of M31. Please note that the grain
is better resolved at 4800dpi, even if not completely. IMHO, the little
quality increase justify the more used memory.

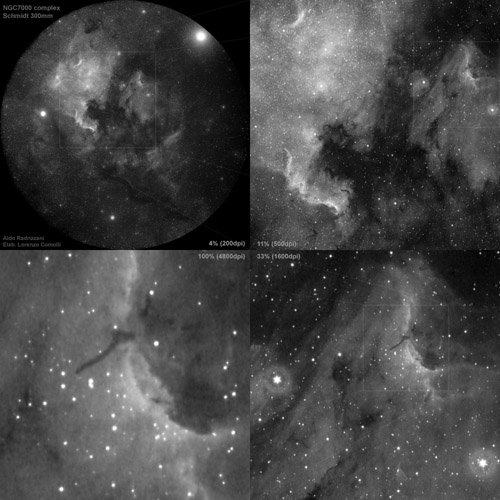
An example of one of Aldo's round
negatives: the North America nebula complex and Pelican. Click on the image for hires.
Conclusions
With actual instruments the scansion of
Technical Pan start to be possible, even if to obtain the best results it is necessary to enlarge
the image by 3 or 4 with a slide duplicator, prior to scanning.
Scanning
the 35mm film directly results in the loss of the smaller and fainter
stars
by about one magnitude. This loss is caused by the pattern of pixels
that
sees the film: imagine that you have a star (of the same dimensions of
a pixel) with a S/N (signal to noise ratio) of 3 and that you scan it
as
a square exactly centered on the star. You'll have a digital S/N of 3;
but if the star is centered on the corners of four pixels, than the S/N
becomes 1.75 (=1+(3/4)). So there is a loss.
A frequent error that is made in
evaluating
the adequacy of a film scanner is to underestimate the importance of
film
grain. Experience shows that unresolved grain translates into a
smoothing
of the background sky thus making even a professional digital print
lights
years from a traditional print.
Thanks to Alfredo
Zanazzo for the long discussion about this problem and to Aldo
Radrizzani for his huge film archive.
Send me your comments or critiques
on
the ideas expressed here, e-mail at: comolli@libero.it.
(Send me also any corrections for my not very good English! ;-)

